Friday, June 20, 2008
Device Connection via Ethernet in VS2005
1. In VS2005 from menu bar choose 'Tools'->'Options...'
2. then in 'Options' dialog select 'Device Tools'->'Devices'
3. from 'Show devices for platform' select your device and press ' Properties...' button
4. and then press 'Configure...' button in the new dialog.
In 'Configure TCP/IP Transport'dialog
1. keep 'Use fixed port number' unchecked
2. Select ' Use specific IP address' and enter your device real IP address
Copy the following files to the \Windows\ folder on the device. These files are located on the development computer by default at \Program Files\Common Files\Microsoft Shared\CoreCon\1.0\Target\wce400\.
Clientshutdown.exe
ConmanClient2.exe
CMaccept.exe
eDbgTL.dll
TcpConnectionA.dll
From the command prompt on the device, run conmanclient2.exe.
Double click to run CMaccept.exe
In Visual Studio, do 'Connect to device' from tools menu.
Select your device. Now connection should succeed.
2. then in 'Options' dialog select 'Device Tools'->'Devices'
3. from 'Show devices for platform' select your device and press ' Properties...' button
4. and then press 'Configure...' button in the new dialog.
In 'Configure TCP/IP Transport'dialog
1. keep 'Use fixed port number' unchecked
2. Select ' Use specific IP address' and enter your device real IP address
Copy the following files to the \Windows\ folder on the device. These files are located on the development computer by default at \Program Files\Common Files\Microsoft Shared\CoreCon\1.0\Target\wce400\
Clientshutdown.exe
ConmanClient2.exe
CMaccept.exe
eDbgTL.dll
TcpConnectionA.dll
From the command prompt on the device, run conmanclient2.exe.
Double click to run CMaccept.exe
In Visual Studio, do 'Connect to device' from tools menu.
Select your device. Now connection should succeed.
Saturday, April 05, 2008
Functionality Removed from Windows Embedded CE 6.0
Topics Description
COM and DCOM
Distributed COM (DCOM), sometimes also referred to as COM Remoting, is not included in CE 6.0. For more information, see this Microsoft Web site, or contact Microsoft support or an authorized distributor to inquire about possible alternatives.
Export Wizard
The Export Wizard has been removed from CE 6.0. For information about a workaround, see Exporting a Catalog Item from the Catalog.
File Viewers
The Microsoft Excel, Microsoft PDF, Microsoft PowerPoint, and Microsoft Word viewers are no longer available from the catalog in CE 6.0.
IEEE 1394
CE 6.0 no longer provides device drivers for IEEE 1394 devices. IEEE 1394 device drivers may still be available for Windows Embedded CE through third-party vendors.
Inbox
The Inbox, also known as the Messaging Application (PMail), has been removed from Windows Embedded CE.
Native Wi-Fi
CE 6.0 does not support native Wi-Fi.
Peer-to-Peer Networking
Peer-to-Peer Networking (P2P) has been removed from Windows Embedded CE.
Pocket Internet Explorer
CE 6.0 no longer includes the Pocket Internet Explorer browser.
The catalog items corresponding to the SYSGEN_PIE and SYSGEN_WEBVIEW variables have been removed.
If you set the SYSGEN_HELP variable, you must now set the SYSGEN_IE or the SYSGEN_IESAMPLE variable to achieve an effect.
SDK Wizard
The SDK Wizard has been removed from CE 6.0. The SDK Wizard has been replaced by the SDK development tool accessed through Visual Studio. For more information, see SDK Development.
x86 Emulator
The x86 emulator has been removed from CE 6.0. Instead, Windows Embedded CE includes a new Device Emulator that emulates the operational behavior of a target device based on an ARM microprocessor. For more information, see Device Emulator.
Thursday, April 03, 2008
Connecting the CE 5.0 emulator to VS2005
Title: Connecting the CE 5.0 emulator to VS2005
From: Lewis Williams
Email (Optional): lewisw#tesco.net
Added: 3/10/2007 5:32:12 AM
Message: Connecting the CE 5.0 Emulator to VS2005
1. This uses the network method and saves the emulator state. It does not use activesync, communications ports or a null modem cable.
Start the emulator using a shortcut command that is something like this:
"C:\Program Files\Windows CE 5.0 Emulator\Emulator_500.exe" nk.cem
/video 640x480x16
/Ethernet virtualswitch
/sharedfolder "C:\CE5SharedFolder"
The shared folder appears on the emulator as \My Device\Storage Card. Using the shared folder, copy the following files to the \My Device\Windows\ folder on the emulator. These files are located on the host at \Program Files\Common Files\Microsoft Shared\CoreCon\1.0\Target\wce400\x86, or similar
Clientshutdown.exe
ConmanClient2.exe
CMaccept.exe
eDbgTL.dll
TcpConnectionA.dll
2. Select Emulator -> Start Menu -> run -> \Windows\conmanclient2.exe.
3. Get the IP address of the emulator by double-clicking on the T networking symbol bottom left. If it has no ip address try installing Microsoft Loopback Adapter on the host, check for Virtual Machine Network Services, or other host networking hacks. (This is the difficult bit).
4. To check that the emulator is responding, on the host type Ping at a DOS prompt.
5. To get "Save State" working on the emulator, shut down the emulator using the "Save State" option. Then navigate to Host -> My Documents -> My Virtual Machines
6. The saved state is in the folder that is named with a curly brackets string similar to {06A8A448-EB8B-4E0B-8A88-451412A10C66} say, and known as a GUID. Attempt to rename this folder so that you can highlight and copy the GUID string itself (not the folder).
7. Then add an option, which is similar to /vmid {06A8A448-EB8B-4E0B-8A88-451412A10C66}, to the emulator shortcut command above.
8. The shortcut should now start the emulator from its saved state. It is a good idea to back up the saved state folder.
9. On the host select Visual Studio 2005 -> Tools -> Options -> Device Tools -> Devices
10. Then select Windows CE 5.0 Device -> Properties -> Configure
11. In the "Configure TCP/IP Transport" dialog box, select "Use specific IP address", and then type the emulator IP address you found above.
12. Close the dialog boxes.
13. Select Emulator -> Start -> run -> \Windows\cMaccept.exe and connect to the emulator from VS2005 within three minutes.
14. Run your application from Start Debugging in VS2005 and VS2005 should deploy the two cab files nectcfv2.wce5.x86.cab and system_SR_enu.cab first (this may take some time), and then your application.
15. Close your application in the emulator (I've had trouble using the Stop button on the host).
16. Shut down the emulator using the "Save State" option.
17. You may need to re-run cMaccept each time you restart the emulator or VS2005, but the cab files should not need to deploy again, and the emulator ip address should remain the same.
18. To avoid cMaccept navigate host -> programs -> Microsoft Visual Studio 2005 -> Visual Studio Remote Tools -> Remote Registry Editor
19. In the "Select a Windows Device" dialog box that appears highlight the "Windows CE 5.0 Device" option
20. In the emulator run cMaccept and then immediately click OK in the Remote Registry Editor
21. Highlight Windows CE 5.0 -> HKLM -> System
22. Right click in the right hand pane and select New DWORD value.
23. In the name field type (exactly and without the quotes) "CoreConOverrideSecurity" and set its value to 1
24. Close the editor. Shut down the emulator with Save State.
Lewis Williams
Wednesday, January 12, 2005
Enable PB Verbose Debugging Message
If you're built a debug image and you've turned on
[HKEY_CURRENT_USER\Pegasus\Zones]
"FileSys"=dword:20
in your Desktop registry, then you should be getting enough debug message in Platform Builder debug window when debugging the image.
Saturday, November 13, 2004
How to speed up build process (from newsgroup)
Answer one:
u could do two steps:
1. say any project change u could build selected project and then makeimg.
make sure ur WINCEREL=1
2. use command prompt.
set WINCEREL=1---> to make sure that whatever u build is copied to release
directory.
go to the target directory and run build -c
and then do makeimg
for platform.bib etc files..just do the changes and copy paste in ur release
directory. and then run makeimage..this will save enough time.
wincerel causes the makefile to copy the target to the flat release
directory after the build has been complete. It doesn't cover all the other
files that also get copied to the flat release directory.
So, you always need to do a buildrel at least once. After that, if
wincerel is set you can just build and your changed binaries will end up in
the flat release directory.
Answer two:-------------------------------------------------------------------
The batch file "blddemo" does a lot of things to build a final image. It
also has a number of shortcuts to speed things up.
Simplified overview of what blddemo does
* SYSGEN Phase
This phase builds the CE kernel based on your selected SYSGEN variables and
BSP variables
- Build anything in Private if needed
- Build everything in Public
- Build your BSP under the Platform directory
* Buildrel Phase
- Copies your built files to the _FLATRELEASEDIR
* Makeimg Phase
- Creates the final NK.BIN based on stuff in the _FLATRELEASEDIR and your
IMG flags
*** Tricks to Speed things up ***
blddemo -q
This will skip building the Private directory. Normally, you never
change anything here anyway so you are just wasting time calculating
dependecies.
blddemo -qbsp
This is new in 5.0 and skips both Private and Public and only builds
your BSP platform. This is common when you are developing device drivers
for a BSP and didn't change the features you bring into your OS Design (no
SYSGEN or BSP variable changes)
WINCEREL=1
When you are building something in PUBLIC and then run makeimg, you
won't see the DLL in you Flat Release DIr (FRD) because it wasn't copied
there. The build system only does that in the buildrel phase which you
skipped. By setting WINCEREL=1 you get the DLL copied to the FRD as the
last step
Targeted Builds (5.0 using the IDE for your builds)
http://msdn.microsoft.com/library/default.asp?url=/library/en-us/wceosdev5/h
tml/wce50tskrunningtargetedbuild.asp
Skipping makeimg by using Release Directory Modules list
If you are debugging an image already flashed to the device, you can
tell the CE filesystem loader to grab your DLL from your PC (in the FRD)
rather than use the one built inside the NK.BIN. This means you can skip
the makeimg step if your newly-built DLL is in the FRD. To do this, go to
the Menu Target \ Release Directory Modules. This will pop-up a dialog that
lets you add your DLL to the list. Now, when you reboot and debug, your DLL
will come from your FRD and not the one in NK.BIN. Combined with Targeted
Builds, this should speed you up a lot.
Saturday, July 17, 2004
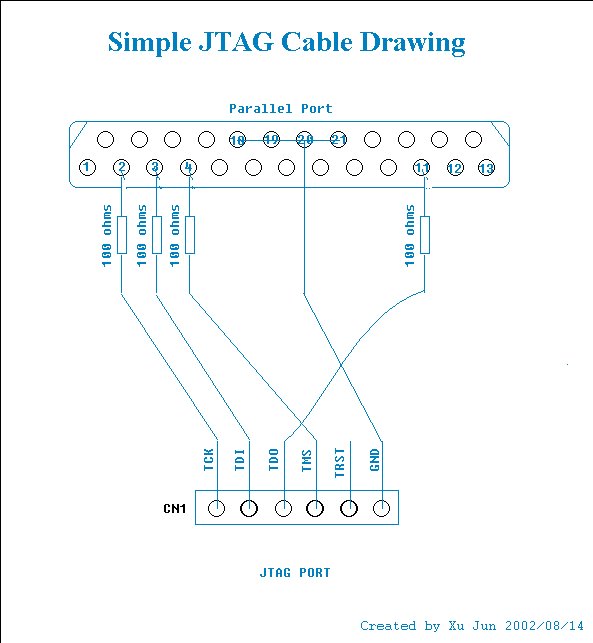
JTAG Cable
JTAG cable usually be used to download firmware to target machice or do hardware debugging with a emulator. In our case, this simple JTAG cable was used to download bootloader to StrongARM platform 

Friday, July 02, 2004
Interrupt Architecture in Microsoft Windows CE .NET
http://msdn.microsoft.com/library/default.asp?url=/library/en-us/dncenet/html/winceinterruptarch.asp
![]()